Wednesday, 18 May 2011

Of a late fourteenth to early fifteenth century dress...

Good evening blog reader! :-) The Squiggle has been more industrious than ever...

So, with my late fifteenth century armourer's wife overgown nearing completion, now was the time to get moving on my slightly earlier, late fourteenth to early fifteenth century merchant dress, which is needed for other living history functions and wearing to an assessed lecture for my degree.

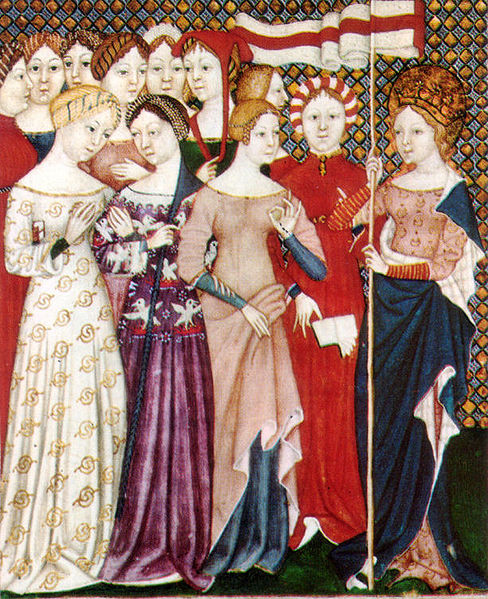
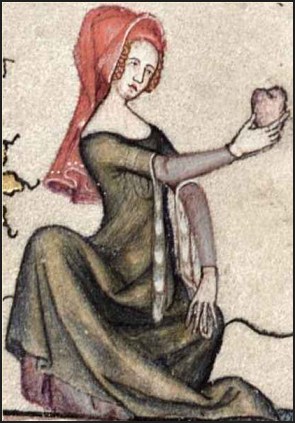
Let's show you a transition of styles in Europe, from slightly looser fitting gowns, through to the beginning of clothes tailoring as we know it now. You might notice that there is little differentiation between countries at this point, though the material itself becomes increasingly elaborate.


The Romance of Alexander, France, 1338-44
(I love the tapering end off the sleeves in this one!)


A marriage - a European Bride and her ladies, 1350's
(Note the slit down the side of her overgown, trimmed with ribbon or braid)


Two women raking hay, Les Très Riches Heures du duc de Berry, Juin the Musée Condé, Chantilly.


Italian illustration, ladies in silk gowns with a saint, ca.1380
(I love the saint's stripy underdress sleeves :-D)


Belles Heures de Duc du Berry, St. Jerome Tempted by Dancing Girls, 1408-9


I've had to hand some of the softest. finest red wool (bottom left) i've ever beheld - one could mistake it for velvet! I've also had a subtle brocade in off-white/cream (right) and red linen (top left) to spare for lining:


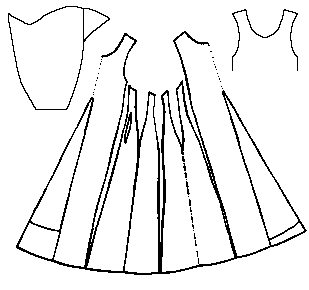
The pattern I've used looks something like this:


Herjolfsnes no.38 tunic with 8 fitted gores and two center front and back gores

The Herjolfsnes gown has been used frequently by re-enactors as a source for an original pattern. Its survival is one of only a pinch of resources. The 'gores' (aka panels) allow the gown to be adjusted to closely fit the body, thus achieving the tailored finish. The top left image is a rough pattern for the sleeve (the little triangle sits a little higher than the shoulder blade, rather than in the armpit where we normally put a diamond shaped insert for freedom of arm movement).

I plan to fasten it down the front with buttons or lacing and possibly have tippets (arm bands with long, dangly bits at the elbows) in white/cream. The fabric has been all cut and the front half of the wool tacked. With time so tight, i've resorted to sewing it together with my old hand-turn Singer machine, rather than hand stitching the whole lot! I'll wear my red linen underdress with the black and gold sleeves underneath....

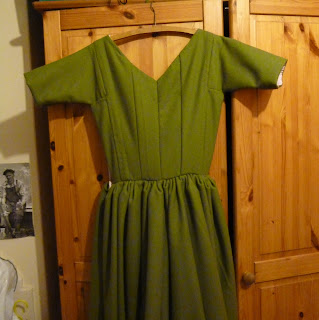
Here are a few shots to give you an idea - better ones to come when more tacking comes out and i can model it! ;-) With the nature of its shape, it's impossible to lie completely flat out. My apologies for the strange colours - my camera wouldn't behave tonight under the room light....

Front body: Right hand side of dress has been machine sewn, left hand side to go, hence the more vague seams.The middle-centre seam has been tacked for the moment to allow me to alter the shape appropriately, but it will be released for lacing later.


Skirt spread: I've closely followed the pattern above, but bringing the front seams a little closer to my bust line because of my petite shape. 

Better photos and more progress to come! Watch this space! ;-D

Sunday, 8 May 2011

Of Sam's Sari Maxi Dress...

It's been one of those bits 'n' bobs days again.
Today was a pattern fitting with my friend Sam for her sari maxi dress, which i'm making for her birthday. In essence it's quite a simple concept, but being a perfectionist i wanted it to fit her well...


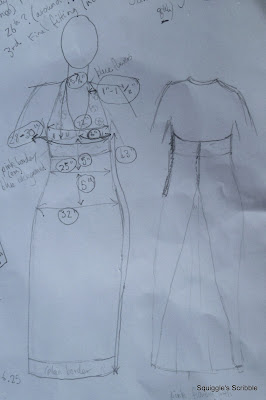
This is my typical first or second sketch, filled with crammed measurements - i'll add a neater sketch, worthy of a portfolio, later. 

Below, the fabric for the main body of her dress (the same as my 1950's dress). All the fabric for her dress is from the same sari, just different segments of it. The half of her body pattern shows off her lovely hourglass-style curves to full effect (ignore the fluorescent man making cunning plots)!


The bust has proven slightly trickier - rather than just a primitive triangular shape, Sam wanted a halter neck style. So i've sat and shaped it to avoid any funny gapes. Fortunately she's almost the exact same size as me, so i could use my own dresses to help shape it.


Above, the fabric for the bust and the pattern for the bust. The creases at the bottom are the result of experimentation of where i should make tucks. I'm not showing the reverse of this pattern, which Sam pointed out to me features the crotches of hunky rugby players... I don't observe these kind of things when i'm trying to make someone else's figure look good lol! It's been promised as a souvenir for her wall... ;-D


Above is the fabric for a triangular insert into the back of her dress. She wants the dress to fit everywhere else, so this piece is vital for allowing her to walk in it. It will start at the base of her hip level and flair out to the bottom.

The whole dress will be lined with pale pink cotton lawn because the stitching on the back of the sari is so fragile. The danger is that the threads will catch and the back of the fabric is rather see-through and scratchy, so it will be soft and protective, yet light.

Next is to get the lining and use it to get the basic shape, do another fitting on her, then cut the sari. This sari frays too easily, so i'm leaving cutting it until the last minute! :-)

Wednesday, 4 May 2011

Of odds, ends and the first Sari dress...

Dissertation has been finally handed in. Final term of my BA degree underway. For the first time in weeks, the Squiggle has been able to sit down and do odds and ends of costume and other people's bits. Whoopee!

Bits included my armourer's new green doublet to match my wool gown for Tewkesbury, starting to cut out a friend's doll clothes pattern, sewing the hem of my armourer's gown and making a start on my summer dress...

The Summer Sari Dress

In the last couple of years i've spent hours trying on baggy dresses in high street shops - i have a few favourites for ones that actually fit, but they cost anywhere between £30-50, and even then they're not always top quality. This year, i've had enough. I can buy a pretty sari with anything up to five or six metres of fabric for as little as £15-£30, so the theory is that if i can make up to three items per sari, it's only costing me £5-10 roughly each (excluding lining, threads, buttons, zips, etc). Even with lining, it's still possible to make cheaper, yet much better fitted clothing for myself. Expecting to make my own Wedding dress to cut costs in a year or two, it will be an excellent exercise in practising making dress patterns through trial and error. 


The main inspiration has been the returning fashion of the 1950's - i love those dresses; the way they fit in the bodice and cut across the chest, then flair out from the waist down, often with netted petticoats. On the other hand, i have a strange love for the vibrant colours and textures of Asia. Coming from a family with history of living in India (with the suitcase of photos to show for it) and having a handful of Pakistani friends at school, i guess it's always been intriguing. Indian saris are becoming one of my favourite things to collect - they can be reused as something else or worn as they were intended. They're graceful and elegant. Wondering how i was going to use some of the saris i have to create a modern dress, i found this:
1950's black and gold printed cotton dress


It's beautiful! The neckline cut is straight across the back too, however i've chosen to have a slight 'V' instead, so the back panels have changed a lot. The front neckline however was the main inspiration, and the way it is clear that a sari was used to create this. 

I have a pink and blue sari with lovely bits of sequin embroidered round some of the edges. When cut, the fabric frays quite alarmingly, so I have had to work very quickly with it to halt disintegration:


The bodice of the dress - to be lined and have straps added, so the armholes won't actually be this small! :-)

It's a very rushed photograph and the fabric needs ironing, but hopefully it should give you the gist. The seams up to the bust are closer together on purpose since i'm quite a petite frame. It looks odd flat, but once it's against me it looks ok. I've hand sewn this first dress, simply for the control factor and the uncertainty of how such fraying fabric would be affected by a machine.

A closeup of the fabric:


The embroidery on the pink edge has had to be knotted wherever it was accidentally cut so as not to lose any embellishments. Hence only using the pink for the front of the dress. Still love it though!

Next is the lining, which is a must for this dress to protect the embroidery threads on the back and to dispel some of the fabric's transparency. (As advised by my lovely friend Licy) I have had enough soft pink cotton left over from my armourer's dress lining  to use for this project's bodice, which will suffice.  

I've not even thought about the lining of the skirt yet.... though i've a feeling it'll have to be pretty radical for those rogue gusts of wind... ;-)

Saturday, 16 April 2011

Of the late 15th century Armourer's wife... 4

It's been a long long long time since i last posted... at least, it feels like it! Dissertation has had to take priority, but sewing a little in the evenings has kept my sanity. FINALLY i've got the green sleeves sewn and altered to fit on my green overdress, so i've got some piccies here:


I've tried to make them not so tight that i can't fit my lined underdress sleeves through. On the subject of underdress, already, the weight of the skirt has taken its toll on the close jump rings fastening the sides... I fear I may have to remove them and add braid/more material to strengthen the sides. before reattaching the rings, so that they don't rip the fabric! I may add some strips of red linen behind the openings, to avoid a draught... brrrr....

Next on the overdress is the hem; although i'm running a vague stitch through the seams of the lining and outer wool so that this is a lot easier! The dress as a whole requires ironing, something i've still failed thus far to do, so it must be done soon... mwahahahah!

Friday, 1 April 2011

Of show girl presentation and good habits...

It's a windy, sunless day outside, so the prayers are that nature is saving the sun for this weekend - Show Time!!

I can be found doing what my friends consider insane and what my fellow re-enactors may consider enthusiastic. I'm hand washing all kit that needs it, polishing and conditioning leather shoes and jewellery, brushing off any missed dry mud (though considering my kit's been in storage all winter, that should have been done anyway last year) ironing my medieval dresses and checking them for any loose threads or tears that require mending. I suspect my underdress needs altering. My fiance can be found finishing my ladies girdle and polishing his own armour in his workshop for the same occasion.

For me, this is a necessity. Tonight and tomorrow morning i will pluck my eyebrows, wash my hair, clean my nails and make sure there's no polish on them; check everything is packed so that nothing's out of place for this weekend's show at Cardiff Castle. So why do i care so much? Why does attention to every last detail for a two-day event matter?

The answer is quite simple. I'm a show girl, and i do it properly. Always have done, always will do.

Picture for a minute this:
It's a medieval event at a castle, you're the public and you've paid money to see a high standard presentation of how medieval life would have been.When you go inside, it more-or-less looks all as it should be, so you take pictures and look forward to playing with them and uploading them to the internet later, or showing them to your relatives. But when you sit down to look at them later on, you spot one girl shot in costume with bright red nail varnish glaring at you, distracting you from the fine rings on her hands, or detail to her sleeves. Another has a dress so creased it must have been crushed in an attic for ages, you can barely appreciate its patterns. Another clearly has used a modern hair band to hold her hair away, and yet you wonder how medieval women really kept hair tidy? Some man in a shirt, coat and hose is licking on an icecream and you wonder why they have a watch visible? Was this really a good show? Did you believe in the people you were observing?

They may sound really obvious mistakes, and the funny thing is that most of the above are really easily solved and are usually the result of forgetfulness or sloppy laziness. Ironing is time consuming admittedly, especially if it is a huge houppelande, but it's no different to ironing the rest of your clothes - it's a respect thing. Both for yourself and what you're wearing. Even just hanging it correctly can limit creases. Sometimes medieval veils had deliberate creases, but that's different. If you want deliberate creases in your veil, do not detract from this by being careless with the rest of the outfit. Nail varnish can be removed in seconds with pads or solution. Hairbands can be covered by ribbons and strips of leather. Thick, gothic makeup or cakey mascara can quickly turn an outfit from natural to fantasy. Minimalistic is always best - makeup only became cakey in Elizabethan times. Even straightened or curled hair by artificial means can look so very wrong! Watches if they must be kept can be hidden in a pouch or wooden box well away from the public. The icecream is a food for when the public has gone home - can't you have a word with the icecream van and arrange for them to reserve you one? It's funny how slipping on one minor thing can completely ruin the overall look.

Perhaps this attitude all goes back to my experiences and habits from the age of eight. I often miss working on stage, where everything had to contend with bright lights and colours. Foundation was bright orange, eyeshadow was bright blue, lipstick bright red, thick mascara, khol black eyeliner and the blusher was positively doll-like. You could be covered in spots on a bad day and still look a million dollars with thick makeup on. All you had to do was sit in front of a mirror for 30 minutes applying it, it was like some kind of soothing ritual. You could do your hair slick back in a tight french plait with gooey gel that would set hard and look smart as anything. Slip on a ready costume that had been maintained by the costume department. All you had to do was turn up with a box of makeup, tights and dance shoes. Those were the good days. :-) My Mum never let me be anything less than smart, and it gave you the feel good factor. Perhaps it was only wearing makeup for special occasions that meant i never felt the need or drive to wear it for school; there was no point - you only got in trouble. Why do that when you could save it all for later?

But what people forget in re-enactment is that working in full contact with the public is even more exposed. You don't have several metres and the darkness between you. In some respects i prefer working face to face with the public than behind several string barriers because it keeps you on your toes. You don't get lazy with your appearance. You pay even more attention to the 'look', just to get it right. If you're one of those who perform behind a barrier, try to treat it like you're face to face with them in your appearance. And people appreciate it. I even scent myself with incense smells of the time so that the public get the whole experience. Many learn best by the memory of sights and smells and colours, so it should be encouraged. The lovely thing is the smell lingers, so it leaves your silks and linens with a slightly spicy scent over the winter. I don't apply makeup if i can help it, otherwise it just rubs on my outfit - pale skin was fashionable. I confess that sometimes the odd dash of pale foundation is applied if skin misbehaves, but never anything too noticable. It can also be tricky putting on suncream when you've got so much makeup - better protected than burnt - the 'burnt princess' or 'cooked knight' look is not impressive...

Maybe i sound a little... OTT or obsessive when it comes to detail, but i firmly believe that attention to every last detail can make the difference between an ok performance, or a gobsmacking one. If you can't get it right when it truly matters, why bother?

Wednesday, 30 March 2011

Of a Princess's upside-down-ice-cream-cone-with-the-tip-lopped-off-by-a-Knight Hat...

...aka a flowerpot (or 'truncated') hennin blog post about my posh hat in the making. ;-)

Ok girls, i'm going to have to do to you what my archaeology lecturers did to me when they told me to forget everything i'd learnt about Indiana Jones and Time Team...

You know that pointy, cone-shaped hat you wore as a little girl to look like a medieval princess? Otherwise known as the 'conical' or 'steeple' hennin? Well here's the crush. It was a French fashion that didn't last very long. Probably for very obvious reasons, pure impracticality probably being the most likely. For some inexplicable reason, in the modern day it epitomises what girls think of when they think medieval princess... however they are extremely pretty!


You can find one of the best collections I've ever found of such image examples on Marie Chantal Cadieux's page: http://cadieux.mediumaevum.com/burgundian-hennin.html
Her whole website remains one of my most used web pages as a resource for costume help. It's excellent and very well thought out!

You may notice that many of these hennins do not have an entirely pointy top - they tend to be slightly rounded, or lopped off. Many women when historical re-enacting now (including myself) opt for something somewhat more practical. Like this:


... and it's fantastic! You just gather your hair into a ponytail or plait, fine hair net or grip it back, tie a width of lined fabric round your head with a flap over your forehead... put a flowerpot shaped frame on your head made with leather, felt or buckram and place a linen or silk hennin coverlet over the top. Pin your flap and coverlet together, pin over a cotton/linen/silk veil if you wish, then fold the two back to secure it to your head! Voila! Your hair stays clean and protected, unaffected by the sun, wind and rain. If done well it should hold all day and you needn't fiddle with it. Here is same hennin of mine with veil added:


Some hennins have a headband of black round the head and along the base of the hat, with a loop over the forehead, presumably to allow it to be pulled back on if it slips. I use one of black (cotton, not synthetic) velvet with my heavier hennins for it has friction that helps the hats fix.

One must note that hennins look a great deal better if worn at at least a forty-five degree angle on the head or parallel with the floor, rather than straight up. Search all images, and you will find that non of them are worn like tower turrets. In my own image of the hennin without a veil I feel that on this particular occasion it was not far enough back, though i have a suspicion that that had more to do with the misshapen nature of the frame underneath.

The best simple frame without fuss i've found yet is the felt fez. My one was not cheap, so i made sure it fitted comfortably before I splashed. It has so far survived many squashes in a travel bag. See below:


Before I'd even covered it, it was required for an event at Kelmarsh last year, so i simply hid it under a beaded silk veil Worked a treat, hardly anyone noticed it was just a fez:


So this year I was determined it deserved a cover worthy of a noble Lady! Not sure where to start, I bought some goldish coloured silk and couched gold thread down in a diamond pattern on it. Couching work was a popular embroidery technique, and it was something I knew I needed to practice.


Couched gold thread with black intersecting crosses.

I've covered the whole fabric with it.


Added glass seed beads in green, gold, black and pearly white. Pearls were a more authentic option than pearly white glass, but also a lot more expensive.

This has so far only been a quarter completed, so its a slow process - normally I can be found on the train sewing these tiny beads on. Some passengers think i must be so patient, others think i'm plain mad! :-) I'm not patient, i just want this posh hennin so badly! Not sure i'll finish it in time for my show this next weekend, but i'll get there soon... fingers crossed...

Friday, 25 March 2011

Of the late 15th century Armourer's wife... 3

Part 3:

So one Squiggle sewed like mad today, trying to hand stitch the skirt of my over-gown on firmly - this wool's quite heavy and i don't have much faith in my stitches, so i was concerned it would drop off.

Front:


Back:


Letting it hang for a while, hopefully it'll settle itself. The bottom hem needs levelling and sewing together. The side lacing and sleeves are next, plus finishing the under dress and sleeves. So close now! Then all it needs is a partlet, apron..... ;-)

Saw all my scraps of damask and brocade today and wondered if i should make a panelled modern dress or coat with them....