Wednesday 18 May 2011

Of a late fourteenth to early fifteenth century dress...

Good evening blog reader! :-) The Squiggle has been more industrious than ever...

So, with my late fifteenth century armourer's wife overgown nearing completion, now was the time to get moving on my slightly earlier, late fourteenth to early fifteenth century merchant dress, which is needed for other living history functions and wearing to an assessed lecture for my degree.

Let's show you a transition of styles in Europe, from slightly looser fitting gowns, through to the beginning of clothes tailoring as we know it now. You might notice that there is little differentiation between countries at this point, though the material itself becomes increasingly elaborate.


The Romance of Alexander, France, 1338-44
(I love the tapering end off the sleeves in this one!)


A marriage - a European Bride and her ladies, 1350's
(Note the slit down the side of her overgown, trimmed with ribbon or braid)


Two women raking hay, Les Très Riches Heures du duc de Berry, Juin the Musée Condé, Chantilly.


Italian illustration, ladies in silk gowns with a saint, ca.1380
(I love the saint's stripy underdress sleeves :-D)


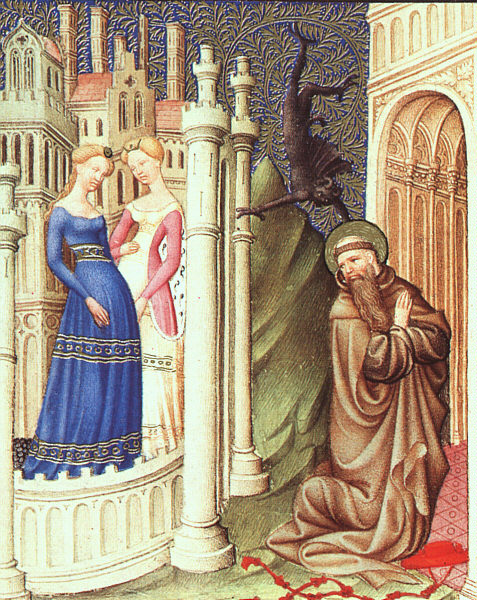
Belles Heures de Duc du Berry, St. Jerome Tempted by Dancing Girls, 1408-9


I've had to hand some of the softest. finest red wool (bottom left) i've ever beheld - one could mistake it for velvet! I've also had a subtle brocade in off-white/cream (right) and red linen (top left) to spare for lining:


The pattern I've used looks something like this:


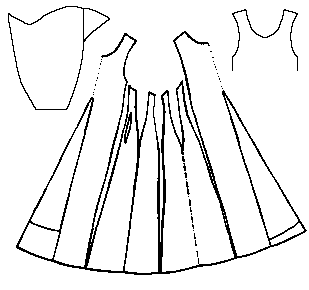
Herjolfsnes no.38 tunic with 8 fitted gores and two center front and back gores

The Herjolfsnes gown has been used frequently by re-enactors as a source for an original pattern. Its survival is one of only a pinch of resources. The 'gores' (aka panels) allow the gown to be adjusted to closely fit the body, thus achieving the tailored finish. The top left image is a rough pattern for the sleeve (the little triangle sits a little higher than the shoulder blade, rather than in the armpit where we normally put a diamond shaped insert for freedom of arm movement).

I plan to fasten it down the front with buttons or lacing and possibly have tippets (arm bands with long, dangly bits at the elbows) in white/cream. The fabric has been all cut and the front half of the wool tacked. With time so tight, i've resorted to sewing it together with my old hand-turn Singer machine, rather than hand stitching the whole lot! I'll wear my red linen underdress with the black and gold sleeves underneath....

Here are a few shots to give you an idea - better ones to come when more tacking comes out and i can model it! ;-) With the nature of its shape, it's impossible to lie completely flat out. My apologies for the strange colours - my camera wouldn't behave tonight under the room light....

Front body: Right hand side of dress has been machine sewn, left hand side to go, hence the more vague seams.The middle-centre seam has been tacked for the moment to allow me to alter the shape appropriately, but it will be released for lacing later.


Skirt spread: I've closely followed the pattern above, but bringing the front seams a little closer to my bust line because of my petite shape. 


Better photos and more progress to come! Watch this space! ;-D

Sunday 8 May 2011

Of Sam's Sari Maxi Dress...

It's been one of those bits 'n' bobs days again.
Today was a pattern fitting with my friend Sam for her sari maxi dress, which i'm making for her birthday. In essence it's quite a simple concept, but being a perfectionist i wanted it to fit her well...


This is my typical first or second sketch, filled with crammed measurements - i'll add a neater sketch, worthy of a portfolio, later. 

Below, the fabric for the main body of her dress (the same as my 1950's dress). All the fabric for her dress is from the same sari, just different segments of it. The half of her body pattern shows off her lovely hourglass-style curves to full effect (ignore the fluorescent man making cunning plots)!


The bust has proven slightly trickier - rather than just a primitive triangular shape, Sam wanted a halter neck style. So i've sat and shaped it to avoid any funny gapes. Fortunately she's almost the exact same size as me, so i could use my own dresses to help shape it.


Above, the fabric for the bust and the pattern for the bust. The creases at the bottom are the result of experimentation of where i should make tucks. I'm not showing the reverse of this pattern, which Sam pointed out to me features the crotches of hunky rugby players... I don't observe these kind of things when i'm trying to make someone else's figure look good lol! It's been promised as a souvenir for her wall... ;-D


Above is the fabric for a triangular insert into the back of her dress. She wants the dress to fit everywhere else, so this piece is vital for allowing her to walk in it. It will start at the base of her hip level and flair out to the bottom.

The whole dress will be lined with pale pink cotton lawn because the stitching on the back of the sari is so fragile. The danger is that the threads will catch and the back of the fabric is rather see-through and scratchy, so it will be soft and protective, yet light.

Next is to get the lining and use it to get the basic shape, do another fitting on her, then cut the sari. This sari frays too easily, so i'm leaving cutting it until the last minute! :-)

Wednesday 4 May 2011

Of odds, ends and the first Sari dress...

Dissertation has been finally handed in. Final term of my BA degree underway. For the first time in weeks, the Squiggle has been able to sit down and do odds and ends of costume and other people's bits. Whoopee!

Bits included my armourer's new green doublet to match my wool gown for Tewkesbury, starting to cut out a friend's doll clothes pattern, sewing the hem of my armourer's gown and making a start on my summer dress...

The Summer Sari Dress

In the last couple of years i've spent hours trying on baggy dresses in high street shops - i have a few favourites for ones that actually fit, but they cost anywhere between £30-50, and even then they're not always top quality. This year, i've had enough. I can buy a pretty sari with anything up to five or six metres of fabric for as little as £15-£30, so the theory is that if i can make up to three items per sari, it's only costing me £5-10 roughly each (excluding lining, threads, buttons, zips, etc). Even with lining, it's still possible to make cheaper, yet much better fitted clothing for myself. Expecting to make my own Wedding dress to cut costs in a year or two, it will be an excellent exercise in practising making dress patterns through trial and error. 


The main inspiration has been the returning fashion of the 1950's - i love those dresses; the way they fit in the bodice and cut across the chest, then flair out from the waist down, often with netted petticoats. On the other hand, i have a strange love for the vibrant colours and textures of Asia. Coming from a family with history of living in India (with the suitcase of photos to show for it) and having a handful of Pakistani friends at school, i guess it's always been intriguing. Indian saris are becoming one of my favourite things to collect - they can be reused as something else or worn as they were intended. They're graceful and elegant. Wondering how i was going to use some of the saris i have to create a modern dress, i found this:
1950's black and gold printed cotton dress


It's beautiful! The neckline cut is straight across the back too, however i've chosen to have a slight 'V' instead, so the back panels have changed a lot. The front neckline however was the main inspiration, and the way it is clear that a sari was used to create this. 

I have a pink and blue sari with lovely bits of sequin embroidered round some of the edges. When cut, the fabric frays quite alarmingly, so I have had to work very quickly with it to halt disintegration:


The bodice of the dress - to be lined and have straps added, so the armholes won't actually be this small! :-)

It's a very rushed photograph and the fabric needs ironing, but hopefully it should give you the gist. The seams up to the bust are closer together on purpose since i'm quite a petite frame. It looks odd flat, but once it's against me it looks ok. I've hand sewn this first dress, simply for the control factor and the uncertainty of how such fraying fabric would be affected by a machine.

A closeup of the fabric:


The embroidery on the pink edge has had to be knotted wherever it was accidentally cut so as not to lose any embellishments. Hence only using the pink for the front of the dress. Still love it though!

Next is the lining, which is a must for this dress to protect the embroidery threads on the back and to dispel some of the fabric's transparency. (As advised by my lovely friend Licy) I have had enough soft pink cotton left over from my armourer's dress lining  to use for this project's bodice, which will suffice.  

I've not even thought about the lining of the skirt yet.... though i've a feeling it'll have to be pretty radical for those rogue gusts of wind... ;-)